Cajon Care and Instrument Profile
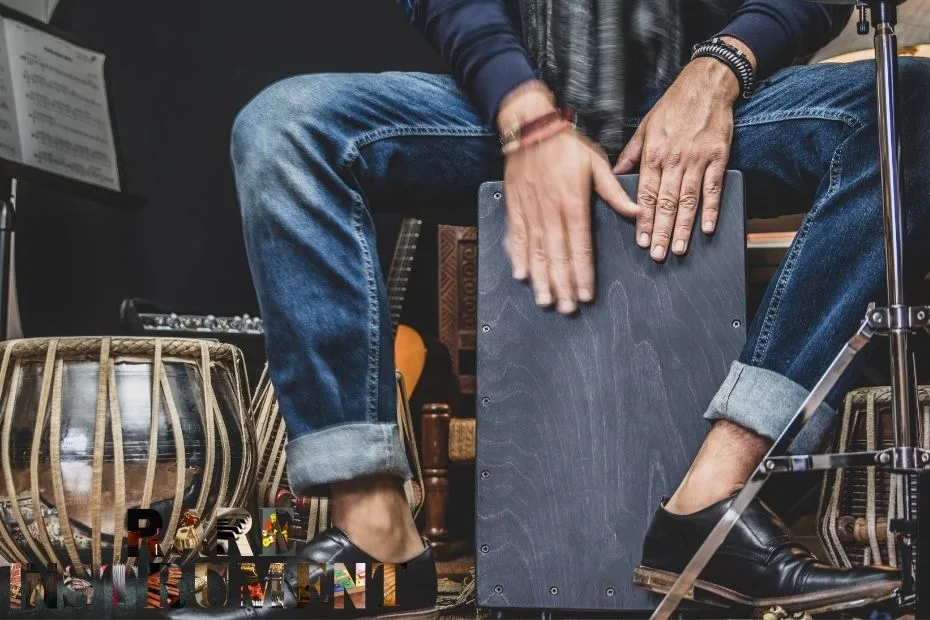
A cajón is a box-shaped hand percussion instrument with a thin wooden playing face called the tapa. Safe care starts with a dry microfiber cloth, very limited moisture, careful inspection of the tapa screws and snare system, and no oil, polish, alcohol, silicone, or household cleaner unless the maker approves it for that exact finish.
How to Clean a Cajon Without Damaging It
Remove loose dust with a clean, dry microfiber cloth. For fingerprints or light grime, use a second cloth that is only slightly damp with plain water, then dry the surface at once. Wipe the tapa gently and keep moisture away from edges, joints, screw holes, the sound hole, and any electronic parts.
Do not spray liquid directly onto the instrument. Do not use furniture polish, alcohol, disinfectant, silicone spray, wax, abrasive pads, metal cleaner, or wood oil as a default treatment. A conditioning product is suitable only when the maker confirms that the cajon has an unfinished or oil-finished surface that requires it.
Care Warning: A cajon is not cleaned like a kitchen cabinet or a conventional drumhead. The tapa is a thin wooden sound-producing panel, so excess moisture, pressure, polish residue, and uneven screw tension can change its response.
What a Cajon Is and How It Produces Sound
The cajon developed in Peru as a wooden percussion instrument played by striking the front panel with the hands. The player normally sits on the top of the box and uses different parts of the tapa to create contrasting sounds. Modern cajons appear in Afro-Peruvian music, flamenco, acoustic pop, jazz, singer-songwriter settings, street performance, and small ensembles.
The lower central area of the tapa moves a larger volume of air and produces the rounded bass voice. Strikes near the upper edge create a quicker, brighter attack. Corner slaps add a sharper crack. On snare cajons, internal wires or strings touch the rear of the tapa and add a buzzing response to upper strokes.
| Part | Function | Care Point |
|---|---|---|
| Tapa | Thin front panel used for bass, tone, and slap strokes | Keep dry, clean gently, and avoid uneven pressure |
| Wooden Body | Forms the resonating chamber and supports the player | Protect joints, corners, and finish from moisture and impact |
| Sound Hole | Allows air movement and shapes projection | Keep clear without spraying liquid or forcing tools inside |
| Snare Wires or Strings | Add buzz, snap, and upper-frequency texture | Do not oil, bend, or clean with metal polish |
| Tapa Screws | Hold the playing panel and influence local response | Adjust only when a real looseness or sound problem exists |
| Feet | Lift the shell from the floor and reduce slipping | Check for wear, looseness, and trapped grit |
Bass, Tone, Slap, and Snare Response
A relaxed palm strike near the center produces the lowest voice. Body volume, tapa flexibility, playing force, and room acoustics affect how full or dry the bass feels.
A stroke above the center gives a more focused note with less low-end bloom. The fingers rebound quickly so the panel can vibrate freely.
A controlled strike near the upper edge creates a quick, sharp attack. The exact hand position differs with tapa thickness, corner flexibility, and playing style.
Internal wires or strings add a crisp response to upper strokes. Too much contact can create constant rattle, while too little contact can make the cajon sound dry or muted.
Player Tip: Clean hands protect the finish and reduce dark buildup on the tapa. Remove rings, watches, and sharp bracelets before playing to avoid dents and scratches.
Tools Needed for Routine Cajon Care
- Two clean microfiber cloths: one dry and one reserved for slight damp cleaning
- A soft, clean brush for loose dust around edges and the sound hole
- A small flashlight for inspecting the internal snare system through the sound hole
- The correct screwdriver bit, used only when a loose screw or setup problem has been identified
- A padded cajon bag for transport and storage
Keep these tools free of grease, polish, metal dust, and cleaning residue. A cloth previously used with furniture products should not touch the tapa or body.
Step-by-Step Cajon Cleaning Process
Remove Accessories and Surface Grit
Take off the seat pad, pedal, pickup cable, brush holder, or other removable accessories. Lift loose grit with a dry cloth or soft brush before wiping, since trapped particles can scratch the finish.
Dust the Tapa
Use light, straight strokes with a dry microfiber cloth. Support the cajon so it cannot slide or fall while the front panel is being cleaned.
Clean Fingerprints and Light Grime
Dampen a second cloth with plain water and wring it until it feels nearly dry. Test a hidden finished area first, then wipe only the affected spot without leaving droplets.
Dry the Surface Immediately
Follow with the dry cloth. Pay close attention to panel edges, screw heads, decorative printing, joints, and any unfinished area where moisture may enter quickly.
Clean the Body and Feet
Wipe the top, sides, back, and base with the same low-moisture method. Remove grit from rubber feet so the cajon sits securely and does not grind debris into the floor.
Inspect the Sound Hole and Interior
Use a flashlight to check for loose debris, a detached wire, a shifted string, or an object that has fallen inside. Use a long soft brush only when loose dust can be reached without bending the snare system.
Let the Cajon Stabilize
Do not place the instrument in a closed bag while any area is damp. Allow it to return to normal indoor conditions before playing, adjusting, or storing it.
How to Clean the Tapa Safely
The tapa deserves more care than the thicker shell because it is both the playing surface and an acoustic part. Its thickness, attachment, finish, and contact with the snare mechanism help determine attack, bass response, slap sensitivity, and buzz.
Begin with dry cleaning. Use a slightly damp cloth only when dry wiping does not remove the mark. Never scrub in circles with pressure, soak a stain, scrape residue with a blade, or push liquid toward the perimeter screws.
Printed, Painted, and Veneered Tapa Surfaces
Decorative graphics and thin veneers may react differently from clear-coated plywood. Avoid solvents and polishing compounds. If a mark remains after gentle cleaning, preserving the finish is safer than repeated rubbing.
Unfinished or Oil-Finished Wood
Some custom instruments use a surface treatment that differs from factory clear coats. Do not assume the wood needs oil because it looks dry. Confirm the original finish and the maker’s maintenance method before applying any product.
Dark Hand Marks
Darkening near the upper playing zones often comes from skin oils, dust, and repeated friction. Gentle regular cleaning limits buildup. Old discoloration may be embedded in the finish or wood and should not be attacked with stronger chemicals merely for appearance.
Can You Use Water on a Cajon?
A small amount of plain water may be used on a cloth for light surface grime, but the cloth should not be wet enough to leave droplets. The safe method is controlled moisture followed by immediate drying.
Water should not be sprayed onto the tapa, poured into the sound hole, left around screw heads, or allowed to collect along panel joints. Moisture can raise wood fibers, soften some finishes, encourage corrosion on metal parts, and contribute to swelling or warping when exposure is heavy or repeated.
Common Confusion: “Slightly damp” does not mean visibly wet. After wringing the cloth, it should transfer almost no free water to the surface.
Safe Products and Products to Avoid
| Product or Method | Decision | Reason |
|---|---|---|
| Dry Microfiber Cloth | Safe default | Removes dust and skin residue without adding moisture |
| Slightly Damp Cloth with Plain Water | Use sparingly | Suitable for light grime when followed by immediate drying |
| Soft Dry Brush | Useful for loose dust | Helps around edges and reachable parts near the sound hole |
| Furniture Polish | Avoid unless maker-approved | May leave residue, alter grip, or react with the finish |
| Alcohol or Disinfectant | Avoid | Can dull, soften, stain, or dry some finishes and printed surfaces |
| Silicone Spray or Lubricant | Avoid | Residue can spread across wood and interfere with future repair or refinishing |
| Wood Oil or Wax | Only with maker approval | Not every cajon has an oil-compatible or unfinished surface |
| Metal Polish on Snare Wires | Avoid | Residue may reach the tapa and wire handling may change the setup |
| Abrasive Sponge or Scouring Pad | Avoid | Scratches clear coat, paint, veneer, and printing |
| Direct Spray Cleaning | Avoid | Liquid can enter joints, screw holes, the sound hole, and electronics |
Cleaning Around the Sound Hole and Inside the Cajon
The interior usually needs inspection more often than cleaning. Shine a flashlight through the sound hole and look for loose objects, heavy dust, detached foam, displaced wires, or a foreign item touching the tapa.
Do not remove the tapa merely to dust the inside. Reinstalling it with different screw tension can change the instrument’s response. Do not push a rigid vacuum nozzle, cloth, or tool against the wires. Avoid compressed air as a routine method because it can drive debris deeper, move light components, or expose the instrument to moisture from the air source.
Electronic and Hybrid Cajons
Disconnect power, pedals, pickups, and signal cables before cleaning. Keep moisture away from controls, jacks, sensors, battery compartments, and trigger surfaces. The electronics manual takes priority over general wooden-instrument care.
How to Inspect Tapa Screws
Tapa screws should not be tightened simply because time has passed. Their position and tension can affect local flexibility near the upper corners, and some makers intentionally use a particular pattern to shape the slap response.
- Look for a screw head that sits visibly higher than neighboring screws
- Listen for a rattle that changes when light finger pressure is placed near one screw
- Check for a panel gap, lifted edge, damaged washer, or cracked finish around the hole
- Use the exact screwdriver type and size so the head is not stripped
- Make only a very small adjustment, then test bass, tone, slap, and buzz again
- Stop if the screw turns without gripping, the wood compresses, or the panel begins to distort
A stripped hole, cracked tapa edge, or screw that will not hold is a repair problem rather than a reason to keep tightening.
Snare Wires, Strings, and Cajon Setup
Cajons use several internal response systems. Some have drum-style snare wires resting against the tapa. Others use guitar-like strings, adjustable wire groups, fixed contact systems, or no snare mechanism at all. Adjustment access may be inside the sound hole, below the instrument, at the side, on the rear, or absent.
Because the designs vary, use the maker’s setup instructions before turning any adjustment screw. A cajon is not normally tuned to one fixed musical note. The practical goal is a balanced relationship between low bass, clean upper tones, responsive slap, and controlled buzz.
Possible causes include excessive wire contact, a loose internal part, a shifted wire, a tapa screw issue, or an object touching the panel. Identify the source before adjusting tension.
The system may have too little contact, a detached wire, poor alignment, or a setup intended for a drier voice. Do not assume that more tension is always the solution.
Compare both upper corners with equal hand position and force. Uneven screw tension, panel wear, wood movement, or construction differences can affect the result.
A loose screw, broken wire, detached bracket, worn foot, pedal hardware, or object inside the shell may create a rattle unrelated to snare adjustment.
Minor Problems You Can Check Before Repair
The Cajon Slides While Playing
Clean the rubber feet and the floor contact area. Check that every foot is present, tight, and at the same height. A non-slip mat can improve stability without altering the instrument.
A Buzz Appears Only on One Note or Stroke
Remove external accessories and test the cajon on a flat floor. Lightly touch one external part at a time while another person plays. This can reveal a loose seat pad, foot, screw, pickup cable, pedal plate, or decorative fitting.
The Tapa Feels Sticky
Skin oil, residue from a cleaning product, or a softened finish may be responsible. Begin with a dry cloth, then use the slight-damp method once. Do not add polish to hide the problem.
The Bass Sounds Smaller Than Before
Check room placement, the sound hole, the floor, stored objects inside the cajon, and recent environmental changes. A wall, carpet, corner, stage riser, or microphone setup can alter perceived bass even when the instrument itself is unchanged.
When to Stop and Contact the Maker or a Repairer
A crack, raised edge, deep dent, or visible distortion can change both tone and structural reliability. Avoid further adjustment until the panel is assessed.
An opening seam or moving side panel needs proper clamping and adhesive selection. Household glue applied from the outside may make later repair harder.
Replacement requires correct material, placement, tension, and contact with the tapa. Improvised wire can scratch the panel or create an uncontrolled rattle.
Repeated tightening can enlarge the hole or crush the wood fibers. Stop when the screw no longer grips normally.
If the cause cannot be seen through the sound hole and external hardware has been ruled out, professional inspection is safer than removing the tapa without a reassembly plan.
Intermittent triggers, damaged jacks, battery leakage, or power problems should be handled according to the electronic system’s service instructions.
Cajon Storage and Transport
Store the cajon in stable indoor conditions away from direct sunlight, radiators, air-conditioning outlets, damp rooms, and rapid temperature changes. Do not leave it in a hot vehicle or place it directly on a wet floor.
- Make sure every surface is dry before closing the bag
- Use a padded bag that protects the tapa, corners, and controls
- Keep heavy cases and equipment off the front panel
- Allow a cold or hot instrument to adjust gradually before playing
- Keep drinks, cleaning sprays, and leaking batteries away from the instrument
- Inspect the bag for trapped moisture, sand, grit, and damaged padding
Silica gel can help in a closed storage case, but it does not correct a damp room or a wet instrument. Replace or dry the packets according to their instructions and keep them secured so they cannot fall inside the cajon.
Playing Habits That Reduce Wear
Good maintenance begins before cleaning. Clean hands leave less residue, controlled technique reduces dents, and safe handling protects the panel edges and body joints.
Keep body weight over the supported top rather than leaning hard against one edge. Follow the maker’s size and weight guidance when available.
Clear tone comes from timing and hand release. Repeated heavy blows are not required for projection and may increase hand fatigue and surface wear.
Do not drag the cajon by the tapa edge or drop it onto one foot. Corner impact can disturb joints and create noises that resemble snare problems.
Pedals, pickups, cushions, brush holders, and microphones can introduce rattles or rub against the finish. Fit them without overtightening clamps.
Mini FAQ
What cloth should be used to clean a cajon?
Use a clean microfiber cloth. Keep one cloth dry for dust and a second cloth for very light damp cleaning. Avoid rough towels, paper products, and cloths contaminated with polish or grease.
Can a cajon be cleaned with water?
Use only a small amount of plain water on a nearly dry cloth for light grime. Never spray, soak, or leave moisture around edges, joints, screws, the sound hole, or electronic parts. Dry the area immediately.
Should a cajon be oiled?
Not as a routine rule. Many finished cajons need no oil. Apply a product only when the maker confirms that the exact unfinished or oil-finished surface requires it.
How often should cajon screws be tightened?
There is no universal schedule. Inspect the screws and adjust only when there is visible looseness, a panel gap, unwanted rattle, or a documented setup need. Make very small changes and test the sound after each one.
Can the tapa be removed for cleaning?
Routine cleaning does not require tapa removal. Reassembly can change screw tension, panel contact, and snare response. Remove it only when the maker’s procedure is available or repair work requires access.
Why does a cajon buzz after cleaning?
Check for trapped moisture, a loose accessory, shifted debris, a raised screw, or an object touching the shell. If the sound continues after the instrument is fully dry and external parts have been ruled out, inspect the snare system without forcing or bending it.